Using Warm and Cool Shades Together - Makeup Tutorial
•Posted on February 07 2018
Often, makeup tutorials suggest using either warm or cool colours. This always looks stunning and is an easy way to make sure the shades don't clash or turn muddy. But you can absolutely mix warm and cool tones together - even ones that might not look like they match on paper. Here, I will be giving a short photo tutorial to show how I used violet and orange tones together to create this soft, smokey look.
The reason I chose violet and orange is that I have a hard time pulling off really warm orangey or yellow shades. They have a tendency to wash me out. Wearing them with warm tones doesn't help the effect much, so I tend to avoid them in general. Today, however, I thought - hey! I'd love to get more use out of my orange shades! So this is what I came up with to make them more wearable on my skin tone. :)
So without further ado, here we go!
These are the shades we will be using today:
 |
 |
 |
 |
| Hypercompetent Sidekick | Trusty Steed | Smiled Like A Knife | Whisky Priest |
| Having a great base will lead to a great look! Use your favourite preparation for putting on eyeshadows. Some people like primers, some like glitter glues; I like just plain concealer! |
 |
| Add a cool-toned crease shade. Any will do! Try to use a matte for easier application. |
 |
| Add a warm toned medium shade to the lid. I chose a copper to contrast with the violet tones of my transition and crease shade. |
 |
| Grab a cool, dark neutral to darken the crease and outer corner of the lid. This will add a lot of dimension and a little drama. My chosen shade is very violet-toned so really makes the copper pop. |
 |
| Add an inner corner highlight and browbone highlight. I used a champagne shade to match the warm copper. |
 |
| Use both the copper tone and the dark shade to smoke out the lower lashline. Use the copper in the centre and the darker shade toward the outer corner. The farther inward to bring the dark shade, the more dramatic this look will be. |
 |
| Finish with some eyeliner and mascara. I used liquid liner and black mascara, but you can use whatever makes you comfortable. I would suggest using an eyeliner of some kind because without it, this look can be a little overpowering. |
 |
| To create a gradient brow, start with a neutral brow pencil that matches your hair colour. Fill in lightly. You don't want your brows too strong at this point. |
 |
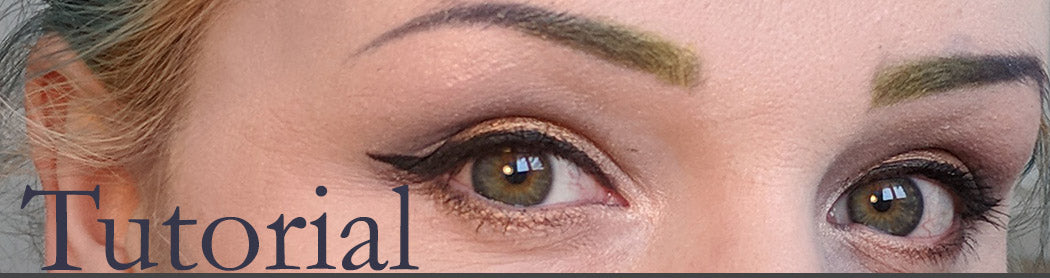
| Choose two colours: here I used navy blue and lime green. Use the darker colour (navy blue) across the majority of the brow, leaving only about half a centimetre clean. On that half centimetre, add your bright colour, and blend them both above your pupil. |
 |
| Finish the look with your favourite contours, highlights, blushes and lipsticks! See the blog post for what I used here. :) Thanks! |
Start with a prepped eye base. Whatever works best for your lids. I tend to use just a concealer as a base. Here, I have patted a little concealer into the lid, crease and brow bone and let set for about half a minute. You can then use a neutral toned eyeshadow to set your base, but I tend to skip this step. The shadows still blend without it!
Once step one is complete, get out your brushes, because we're going into the shadows next. These are all loose pigments, so take care to only pick up a touch on the brush. You can tap excess powder back into the jar, or into the lid of the jar, if you're clumsy like me and knock the jars too hard. These layer easily, so don't be afraid to start small and build up!
Start by laying in a cool, matte shade in the crease. This particular shade is Hypercompetent Sidekick. It's a muted violet shade, and comes up nearly gray. Mattes make great transition shades, since they don't add a ton of extra sparkle to the crease, especially if you're using a shimmer to deepen your crease. Swipe the shade with a shader brush into the crease - and then use a blender brush to soften the edges. You want a soft, smokey wash of colour, so don't worry too much about being a little messy with this step.
You can use any cool shade you like, however - just make sure it isn't too bright or dark - this shade is intended to help the darker and brighter shades blend more seamlessly with your skin tone. Shai Hulud or Killing Time would also be two good choices. For those with deeper skin tones, you could try Reverend Mother or Idaho too.
Next, pat Smiled Like a Knife onto the lid. With loose pigments like ours, you'll get the best colour payoff and shimmer by gently patting a small amount of colour directly onto where you want it. If you swipe it across the lid, you might find it going patchy, or you might sweep away the mica, which gives the shade the vibrance and shine!
You'll want this this shade across the whole lid, and use a slightly heavier hand on the centre of the lid. If you pat it on in layers, you will avoid most of the fallout from loose pigments.
The next step is to pat Whisky Priest into the crease. This shade is quite dark and has a purple tone to it. I chose it because it's still quite brown, so will meld the copper and violet shades really nicely. Be careful to pat it into the crease with a soft shader brush in light layers! You can make it as dark and as smokey as you want, but it's hard to take away a dark shadow once you've put it on your face if you find the look TOO dramatic. Tarnish or Mysterious Waif would also be fun choices to try with this look! Once you have the shadow where you like it - on my eye shape, this is in the crease and on the outer quarter to third of the lid - GENTLY blend it into your transition shade in the crease and into the copper shade on the lid. The colour doesn't need too much work! They'll blend with some gentle tapping. You don't want to overblend with shades like these or you're end up with mud.
Add some Smiled Like A Knife with a small pencil brush to the centre of the lower lashline. Then blend some Whisky Priest on the outer third or so of the lower lashline. Blend together. You can make your lower lashline as dark and dramatic as you want by pulling Whisky Priest further and further across toward the inner pupil. I would suggest, if you're going to have a dark lower lashline, to add a liner to your waterline just to polish the final look. I don't feel this is necessary with a lighter lower lash.
Finally, we are going to highlight the inner corner and brow bone! For this I chose a soft champagne shade, Trusty Steed to do the dirty work. I find it works to bring the cooler and warmer shades together. A white shimmer might also work nicely! I used a pencil brush on the inner corner for higher shine and my blender brush to add just a smidgen of the eyeshadow to the brow bone for a much subtler sheen.
I finished the eyes with a winged liner and black mascara. :) You could skip the liquid liner and just tightline your lashes with a pencil or gel. This look looks awesome that way too.
In order to do the eyebrows, I filled in my brows with a dark, cool brown pencil (the shade is called "granite" - It leans quite gray and looks nearly black in the pencil! My hair is very fine but naturally quite dark, so a deep shade like this is really helpful.
This shade will act as a base and a primer for your coloured powders to create a gradient brow. I use Crow & Pebble eyeshadows for coloured brows because I don't mind a bit of shimmer, but any matte shadows will do if you want something slightly more natural looking!
When filling in your brows, do so very lightly - you don't want a strong brow at this point in the game. Just enough to mark out the shape and fill in any sparse areas. When this is finished, choose your two colours - I prefer a darker tail shade and a bright head shade. In these images, I am using Intrepid Merchant for the tail and Chernobyl Power Station for the head. My hair is blue and brassy blonde, so this was a fun match!
Using an angled brush, add the Intrepid Merchant to three quarters of your brows, starting just above the inner edge of your iris, closest to your nose. Most of the brow, except for the very inner corner, should be filled in with the darker shade. Add this shade right to the end of the tail. With the Chernobyl Power station, fill in the inner corner of the brow, and then overlap the two shades above your pupil, blending them together. You should end up with a soft gradient if you're gentle with the blending.
To finish off the face, I used Merlin contour powder and Aradia highlight to give myself a cool shadow and warmer glow. This shade almost suits me as a blush, so I didn't bother with a bright blush today. Finally, I added a new upcoming product - a Crow & Pebble Lipstick from the Sin from thy Lips Collection - this is the shade Cordelia, which is a bright warm-toned pink! It's not quite coral. These lipsticks will be released this month!
So there you have it! Finish with whatever powder or spray you like - it's all good! And go out and take on the world with your cool toned and warm toned eyeshadow look!
Comments
1 Comments
-

Posted by Lisa Millar | May 23, 2018
Leave a CommentThis looks very nice indeed; I particularly love how your gradient brow looks, and I definitely think you should share more tutorials on this page!